Pages

Tuesday, October 26, 2021

Chocolate and Liquorice Cake with Fennel

Every so often I see or read something and think that it will be worth trying.
I'm thinking this is one of those recipes...
So it's being put on this blog in order that I can find it easily.
Thanks to Cuisine magazine, Issue 206, July 2021 page 118
I'll be back to update once I've had a chance to give it a go.
I still haven't got a conclusion on the correct way to spell licorice/liquorice

Chocolate and Licorice Cake 
This makes 1 cake that can serve 4 to 6 people

150g caster sugar
130g plain flour
40g brown sugar
7g baking powder
3g baking soda
1g salt
1g powdered star anise
100ml molasses
100ml vegetable oil
100ml orange juice
90ml licorice water
1 egg
1 egg yolk

Preheat oven to 175 degrees Celsius
In a bowl, sift the dry ingredients.
In another bowl, whisk the wet ingredients and eggs.
Pour this into the dry ingredients bowl 
and mix gently with the whisk  until smooth.
Pour this batter into a lined 24x15cm cake tin.
Bake for 45 minutes or until an inserted skewer comes out clean.
Cool cake in the tin before turning it out.
Trim the top of the cake with a serrated knife to make it flat.
Place cake on a cake rack set over a tray.

Warm the ganache gently in a saucepan stirring constantly.
Pour over the cake to cover the entire surface.
Place in the fridge to set.
Once set, trim away the edges to make it squared up
so the delineation between cake and ganache can be seen.
Garnish with macerated fennel and fronds, if desired.

Licorice Water
1 bag hard aniseed candy
500ml water

Bring candy and water to a gentle simmer over low heat.
Stir occasionally until candy is completely melted.
Set aside in the fridge.

Chocolate Licorice Ganache
260g soft organic licorice
400ml water
100g 70% dark chocolate (broken into pieces)

Finely chop the licorice and combine with water
in a saucepan over a low heat on the stove.
Stir often until nearly melted.
Pour into a blender and blitz until smooth.
While the mixture is still hot, add the chocolate
and mix until the ganache forms.
pour into a container and set aside.

Garnish (optional)
80g sugar
80ml water
30ml white vermouth
half fennel bulb
fennel fronds

Combine sugar and water in a small saucepan.
Heat until sugar is dissolved.
Take it off the heat to cool.
When cool, add the vermouth.
Peel the outside of the fennel bulb.
Shave it thinly with a mandolin.
Macerate the fennel in the vermouth syrup
and keep it in the fridge to serve cold.
Garnish with fennel fronds. 

So, there you have it - and me for future reference.

Tuesday, February 09, 2016

Ciabatta bread recipe in breadmaker

If only bread-makers could make artisan styled products... No, not really.
If I'm not in the mood to start from scratch then I see nothing wrong using gadgets to help me on my way. Ciabatta is a great bread - easy enough to buy from the supermarket when getting groceries - but so much tastier when made fresh at home.
So, here's an easy recipe for Ciabatta that lets your bread machine do all the kneading and tastes like you spent hours on it.

Ciabatta breadmaker recipe

1½ cups water
1½ teaspoons salt
1 teaspoon white sugar
1 Tablespoon olive oil
3¼ cups flour
1½ teaspoons yeast

1.  Put all the ingredients into your breadmaker in the order above. 
2.  Select the dough only cycle and press start. 
3.  In this recipe - sticky and wet dough = a fluffy loaf - so leave it be.
4.  Once the kneader blade stops churning and the dough cycle beeps "finished", leave the dough alone for 15 minutes.  
5.  Tip the rested dough out onto a floured surface and divide into 2 loaves
6.  Line baking paper onto a baking tray and place the loaves on the baking paper
7.  Dimple each loaf with your fingers and LIGHTLY dust the top of the loaves with flour
8.  Cover with a teatowel and let the loaves 'rest' for 45 minutes
9.  Preheat oven to 200°C
10. Place the tray on the middle rack and bake for 20 minutes
11. Let bread cool then enjoy

This same Ciabatta dough can be used to make square rolls instead of loaves. Just divide the dough into 4, 6, or 8 equal amounts - 12 if you're going to make sliders. Nice and easy.


Ciabatta bread maker recipe


Sunday, February 07, 2016

Ginger Beer recipe

I've always liked ginger beer. As a kid, I was given a rustic bottle of it - cloudy, fizzy and refreshing. The drink was even more exciting when one or a few raisins were found in it. On rare occasions, the sediment at the bottom used to be unpleasant, but I soon learnt how to drink the fizz without the 'mud'.
Nowadays, we buy it in bulk and always have some in the fridge ready to be consumed whenever we like. But it's not the same as my memories.
So I decided to find out how to make ginger beer the old fashioned way.

Gotta have a starter - yes, this takes time and patience - and a little effort every day, but seriously, how much of an effort is it to add two half teaspoons of ingredients per day? I simply ticked off on the calendar in our kitchen each time I did it so an easy way to keep track.

Ginger Beer Starter/Bug/Plant - call it what you want

1 teaspoon dry yeast
half teaspoon sugar (I prefer raw sugar)
1 cup warm water
half teaspoon ground ginger

Find yourself a large jar
Put all the ingredients in the jar and mix
Cover the jar with muslin or cloth

Every day - for eight days - add half a teaspoon of sugar and half a teaspoon of ground ginger to the jar.
When you've done this - strain the starter through muslin and add it to the ginger beer syrup

Ginger Beer Syrup

6 litres (24cups) water
4 cups sugar
2 cups lemon juice - or one cup if you're chicken

Put the sugar in a large pot and mix with 6 cups of water
Heat until sugar dissolves
Remove from heat and add the rest of the water and lemon juice
Add the strained ginger beer starter
Mix well
Pour into bottles and put a lid on them
Leave for 5 days
Then refrigerate and enjoy


Ginger Beer recipe


Saturday, February 15, 2014

Pineapple Pie Recipe

Something sweet?, something easy?, something tasty?, something summery?
Oh yeah! Then you gotta try this...

Pineapple Pie

1 ready-made pie crust (or shortcrust pastry, or a cheesecake base)
400g tin condensed milk
300ml cream
435g can of crushed pineapple (or crush your own fresh pineapple if you have it)
1/2 cup lemon juice

Combine lemon juice and condensed milk in a bowl
Drain the juice from the pineapple and mix this into the milk mixture
Whip cream 'til stiff and fold this into the pineapple mixture
Pour it into your crust and chill in the fridge 'till set

Enjoy...
Seriously, what couldn't be easier?

Add shredded coconut and lemon zest for something a little more tropical tasting


Pineapple Pie Recipe


Pear, Walnut and Blue Cheese Salad

Yhup, it's summer time - and autumn is fast approaching, so here is a tasty lil salad to add to the lazy summer meal or bbq.

PEAR and WALNUT SALAD


For the dressing:  2 teaspoons of runny honey
                           1/3 cup of extra virgin olive oil
                           2 tablespoons white wine vinegar
Combine these three ingredients together to make the dressing. Couldn't be simpler...

2 pears - whatever variety is in season and/or to your preference.
Simply core the pears and cut thinly (with the skin on).
Place in a bowl and pour most of the dressing over them

4 big handfuls of lettuce (rocket works best - but whatever salad leaves you like)
1 small red onion - cut thinly into slices
100g of blue cheese - crumbled
1/2 to 3/4 cup of lightly toasted walnuts
Combine these all together - then scatter the pear slices on top - followed by the remaining dressing

And enjoy

We've made this salad a few times already - and always a winner...
Feel free to add sliced celery as well if you want to bulk it up a bit when extra guests arrive
And for the "whole-hog" effect, add thin slices of fresh fennel bulb as well
Let your guests crack pepper and flaky sea salt over their portion themselves


Pear, Walnut and Blue Cheese Salad


Saturday, December 28, 2013

What To Do With Parsley

I don't have much of a green thumb. The sum total of my gardening exploits are getting the lawn mowed, keeping weeds out of stone edges and watering the myriad of pot plants we have grouped together to form some sort of a green oasis around our house. I have tried growing veges on occasion but they have all succumbed to the wind so I don't bother anymore - apart from growing rosemary and parsley.
parsley

I love the smell of fresh herbs - rosemary, basil, mint, coriander, sage, thyme. The only green herb that has had any success with me is parsley - oodles of it! Both frilly and flat-leafed varieties. So this post will be my homage to all the delectableness that parsley has given us.

WALNUT and PARSLEY PESTO

You'll need:  1 cup of walnuts (obviously shelled)
                     2 cups chopped parsley
                     half a cup of grated Parmesan cheese
                     3 cloves of garlic - chopped
                     half a teaspoon of salt
                     half a cup of extra virgin olive oil

Put all ingredients - except the olive oil into a food processor and blitz a few times to combine.
Run the machine at half speed and drizzle the olive oil into the mixture for no more than 30 seconds
Use straight away or cover and keep in the fridge - but use within 5 days
parsley and walnut pesto

How to use it?
Spread on crackers, toast or similar
It's great mixed into pasta
Dollop it over new seasons potatoes
Great with fish too

There ya go - enjoy


What To Do With Parsley


Sunday, November 03, 2013

Lychee, Lime and White Chocolate Mousse

I woke up the other morning with the heady smell of freshly peeled tropical lychee still lingering from my dream. As kids we used to eat them fresh from the tree, cracking open the brittle skin, biting the flesh off the big seed inside, then spitting the seed out and finish chewing the sweet juicy fruit before enjoying more.
I no longer live close enough to the tropical temperate zone where a lychee tree in the garden is an option, but have found that these lovely fruits do come canned these days.

lychee fruit

This is what you need:
1 can (565g) lychees
2 teaspoons gelatin
2 tablespoons water
150g white chocolate
1 cup cream
1 lime - finely grated zest and juice


Drain lychees and blitz the fruit few times in a food processor
Push this mix through a sieve to make a smooth purée
Lychee purée
Sprinkle gelatin over the water in a small bowl and let it swell (about 5 minutes)
Break the white chocolate into pieces and add ½ cup cream. You can melt this in a microwave dish on medium power or by using a double boiler - stirring till smooth
Add gelatin - stirring until dissolved
Stir in the lychee purée
Stir in the lime juice and zest
Chill this in the fridge for around 10 minutes
Whip the remaining ½ cup cream just until soft peaks form - not too runny, not too thick
Fold this into the chocolate mixture
Then spoon into small serving glasses (we used Martini glasses)
Back into the fridge for at least half an hour before serving

Sadly, I didn't get to photograph the mousse chilling in the fridge, but here it is half eaten...
Lychee Lime and White Choc mousse

Not a disappointing dish at all...


Lychee, Lime and White Chocolate Mousse


Sunday, September 01, 2013

Turkish Delight as Irish Moss - recipe

Did I already tell you I like sweet things? Yeah?
And on those rare occasions when I'm allowed to have free reign in the kitchen - I make sweet treats - and according to the top chef of the kitchen - a mighty BIG mess too. But we get there...

Since my attempt at making pink Turkish Delight was successful, I decided to try mixing things up a bit and make Irish Moss. Well, it's what we call it in this corner of the world - not a piece of seaweed was used...


home made Irish Moss - liquorice jube
This is what you need:
* 400g sugar - 2 cups
* 35g (75ml) cornflour - 2 Tbl spoons/¼ cup
* 1ml (a pinch) of citric acid
* 200ml water

* 125g licorice - chopped
* 1 or 2 tots black Sambuca (optional)

* 6 teaspons powdered gelatine sprinkled onto 50mls water (or if you have leaf gelatine, use 12 sheets soaked in 400mls of water for 5 minutes before squeezing out the water)
black food colouring
50g cornflour (105mls)
50g icing sugar (95mls)


This is how you do it:
Rub/spray some rice bran oil (or canola/sunflower oil - you want an oil with very little flavour/taste) around a 12x12cm pan/dish/tin. Make sure your dish is at least 5cm deep...

Mix 400g sugar, 35g cornflour, pinch of citric acid and the chopped up licorice in 200mls of water and stir over a LOW heat until the sugar has dissolved. Sadly, you will never get the licorice to completely melt
Then cook this for 7 minutes (no need to use a temperature gauge - nice!)
boil for 7 minutes
Add the Sambuca (if you've chosen this. The alcohol content will boil away and leave you with just the essence,) and prepared gelatin
Mix this in and stir until the gelatine has melted
Then add some black food colouring until you have the desired shade of night (I've tried it with and without food coloring... and in this case, my preference is eating with my eyes first... it HAS to be black)
Simply pour this mix into your oil smeared pan and let it set/ cool down for a bit
(BUT - if you prefer a perfectly smooth jube without little bits of licorice, then push this mixture through a sieve first. And remember, this stuff is like molten lava at this stage, so be careful)
molten licorice jelly 
Slam it in the fridge for 4 hours at least (on a breadboard worked well for us - to absorb any residual heat and also keep the mix level)
prepare the 50g cornflour and 50g icing sugar by sifting it into a flat bottomed bowl (or into a plastic bag)
Sprinkle some over your breadboard
When you're ready to serve/package: dunk the underside of your pan in hot water for literally a few seconds so that it comes loose easily and goes straight onto your dusted breadboard - ready to be sliced into small blocks or cut into whatever shapes you desire
Roll these blocks of sweet goodness into your cornflour/icing sugar mix
Then enjoy


Turkish Delight as Irish Moss


Turkish Delight - easy recipe

I LOVE a sweet treat on a regular basis. Turkish delight is one of those indulgences that just appeals to me, though not everyone in this household would agree - their loss. No more store bought delight for me...
Finally!! another recipe here that let's us make use of that bottle of rosewater just sitting in the pantry.

This is what you need:
400g sugar (500mls)
35g cornflour (75mls)
1ml (a pinch) of citric acid
200mls water
2 teaspoons rosewater (any more than that and you'll land up with something that tastes like bubblebath - so easy on the rosewater)
6 teaspons powdered gelatine mixed with 50mls water (or if you have leaf gelatine, use 12 sheets soaked in 400mls of water for 5 minutes before squeezing out the water)
pink food colouring
50g cornflour (105mls)
50g icing sugar (95mls)

This is how you do it:
Rub/spray some rice bran oil (or canola/sunflower oil - you want an oil with very little flavour/taste) around a 12x12cm pan/dish/tin. Make sure your dish is at least 5cm deep...
Mix 400g sugar, 35g cornflour, pinch of citric acid in 200mls of water
Heat over a LOW heat until the sugar has dissolved
Then cook this for 7 minutes (no need to use a temperature gauge - nice!)
Add the rosewater and prepared gelatine
Mix this in by stirring until the gelatine has melted
Then add some food colouring until you have the desired shade of pink
Simply pour this mix into your oil smeared pan and let it set/ cool down for a bit
Slam it in the fridge for 4 hours at least (on a breadboard worked well for us - to absorb any residual heat and also keep the mix level)
prepare the 50g cornflour and 50g icing sugar by sifting it into a flat bottomed bowl (or into a plastic bag)
Sprinkle some over your breadboard
When you're ready to serve/package: dunk the underside of your pan in hot water for literally a few seconds so that it comes loose easily and goes straight onto your dusted breadboard - ready to be sliced into small blocks or cut into whatever shapes you desire
Roll these blocks of sweet goodness into your cornflour/icing sugar mix
Then enjoy

If you want to jazz things up a bit, use orange-blossom water instead of rosewater and yellow/orange food colouring instead of the pink. Add some pistachio bits when you put the mix into the oiled pan

And if that ain't enough, look out for our Irish Moss recipe coming up soon - using this recipe but with liqourice and black Sambuka


Turkish Delight - easy recipe

Saturday, August 31, 2013

Rhubarb Rose Cake with a swish of ginger syrup

So you've bought yourself a 250ml bottle of Rose Water for a recipe you liked - but it only required 1 or 2 teaspoons. Now you have 240mls left over - just sitting in the pantry cupboard. What to do? Well, try this...

This is what you need:
2½ cups diced rhubarb
1-2 teaspoons rosewater
1 teaspoon cornflour
¼ cup caster sugar
150g butter - softened
¾ cup sugar
3 eggs
1¼ cups self-raising flour
½ cup ground almonds
¼ cup milk

This is how you do it:
Slap your oven onto 175 Celcius - fan bake
Line a 22cm square cake tin with greaseproof paper
Combine diced rhubarb, rosewater, cornflour and caster sugar. Mix it up real good
Spread this mix evenly over the base of your cake tin
Haul out your electric beater from that drawer that has everything in it (I always seem to find one beater attachment quite easily but spend a good deal of time rifling through all the other bits and pieces of utensils before finding the other one) then cream the butter and sugar together for a good 3-4 minutes on medium speed
Add eggs (at room temperature) one at a time, beating well
Into this mixture, fold the sifted flour, almonds and milk until you have a smooth batter. No need to overdo it...
Spoon this batter over the top of the rhubarb - making sure it has a smooth even top
Then bake it for 45 minutes or so - or until your cake is golden and a skewer inserted into the centre comes out clean
Leave the cake in the tin and let it cool on your bench for around 20 minutes - while you make the ginger syrup.
Put a serving tray over the top of the tin and invert/flip it. Now remove the baking paper
And - you're ready to serve as is, or cooled down a bit more. The good news about this cake is that it keeps well in the fridge for 2-3 days and is quite ok when heated up in the microwave.

For the Ginger syrup:
1 cup water
¼ cup honey
6 pieces crystallised ginger - sliced

Combine water, honey and ginger in a medium saucepan and simmer for 5-10 minutes. You want it slightly reduced but definitely syrupy. Best way to serve is warm (or at room temperature) spooned over the cake.
No need to say that the cake and syrup deserves to be accompanied with whipped cream or a good vanilla ice cream.
There you go... Enjoy

Special thanks to Jo Wilcox and NZ House and Garden magazine for the recipe


Rhubarb Rose Cake


Sunday, December 16, 2012

Lemongrass and chilli prawns

it's the barbecue season, and if you're tired of making garlic buttered prawns -  then here's a quick tasty recipe to liven up your tastebuds.

Always remember - fresh prawns give more flavour if you cook them with the shell on
Don't have fresh prawns? No problem - use frozen, but make sure they're cooked through properly by increasing the cooking time
Enjoy with a dry white wine

2 lemongrass stalks
2 kaffir lime leaves
2-3 tsp chilli paste (or sambal oelek)
1 tsp minced ginger
1 peeled shallot
2 Tbsp coriander - finely chopped
grated rind and juice of 2 limes
1 Tbsp fish sauce
500g whole raw prawns (if you have shelled raw prawns, then use 350g)

cut the lemongrass so you're only left with the white bit (remove the tough core)
(the green stems can be used to make tea or a stock)

take out the central vein from the kaffir lime leaves - leaving only the leaf bit

in a pestle and mortar - or a mini food processor - put the lemongrass, kaffir lime leaves, chilli paste, ginger, shallot, coriander, lime rind and juice and fish sauce. process until you've got a nice paste.

put the prawns into a sealable plastic bag and toss them in the mixture you've just made.
refrigerate for 20 minutes

barbecue or pan fry the prawns for 3 to 5 minutes on each side (total 7-10 minutes)
turn only once until the prawns turn a pinky salmon colour and are cooked through

if you want - drizzle with a LITTLE sesame oil before serving

serve with coriander and mint leaves on a bed of cooked vermicelli or thin Asian noodles


Sunday, July 01, 2012

BUTTERMILK RUSKS - recipe and pictures


Sometimes there's nothing nicer  than to dunk a rusk into a good cuppa tea or strong coffee...
Store bought rusks are fine (if you can find them) but why not give this recipe a go. It's active relaxation and you can enjoy the results better than a bought one. 
Just like Ouma used to make

BUTTERMILK RUSKS

(bear with me - final outcome photo still to be processed...)

This is what you need:

1 kg self raising flour
5 ml baking powder (1tsp)
10 ml salt (2 tsp)
2 large eggs
200 ml white sugar
500 ml buttermilk
190 g butter, melted (measure the butter first, then chop into chunks and put in a microwavable jug/bowl. 
For this recipe we gave it three 30 second bursts on high power - stirring after each zap - since we used frozen butter)


This is what to do:
Sift the flour, baking powder and salt together. 
Beat the eggs, sugar and buttermilk together. 
Cut this mixture into the dry ingredients with a knife. 
Knead the dough lightly - gradually adding the melted butter while kneading. 
This will take only a few minutes until it becomes a good soggy dough.


Pack balls of dough tightly into greased loaf pans. The balls should reach about 2/3rds the height of the pans. 
(we rolled balls of dough - then slightly squashed them to form a tube shape to get more in the loaf pan)


So you're probably thinking, "how big does the dough ball have to be?"...

Well, my first attempt - I rolled dough the size of meatballs. These came out humongous and barely fitted into the teacup! (self raising flour has the unique knack of expanding the dough when it cooks. Funny that - hehe) This batch was slightly smaller than a meatball size - and I still had to slice the baked rusks with a sharp bread knife to get them to that dunk-able size . Next batch - I'll try making a whole lot of small balls (the size of a plum) and put them in a large roasting dish so they can be pulled apart after baking and hopefully not need to be sliced. 
But that's the fun in trying something new (and tasty) 


Bake at 180C for 30 minutes (conventional oven). 
Check whether the rusks are done by tapping the top surface; it should sound hollow. 
Turn out onto a wire rack and break into individual rusks. 
If they look too big to fit into your tea cup or coffee mug - feel free to slice them to the required thickness


Lower the oven temperature to 100C and dry the rusks for about 4 hours, turning them every 30 minutes. 
Since we have a fan oven, the temperature was lowered to 75C with fan on for the same amount of time...


Cool on a wire rack and store in airtight containers. 
Will keep for at least 3 months, but believe me, they won't last that long!

So thanks to my mate Ray who sent this recipe, there are now always home-made rusks in the cake tin


BUTTERMILK RUSKS - recipe and pictures


Sunday, March 25, 2012

Pancakes - Lemon and Blueberry

Great for a weekend brunch meal.
This recipe makes up to 8 tantalising pancakes

Ingredients
1 cup self-raising flour
1 cup buttermilk
2 eggs
2 Tbsp sugar
½ tsp baking soda
grated rind of ½ lemon
3 Tbsp melted butter or margarine
1 cup blueberries

Method
Blend all ingredients together (but not the melted butter or blueberries) to form a smooth batter
Once you have a smooth batter, add the melted butter/margarine and the blueberries and mix well
Lightly grease a non-stick frypan and add enough of the mixture to cover the bottom of the pan
Swirl the batter to create an even layer
Cook over a medium heat
When you see bubbles form, turn the pancake over and cook the other side
Serve hot or cold with cream or yoghurt and some extra fresh berries

If you just want plain pancakes - don't add the lemon rind or berries
Either way, they're great

Enjoy


Sunday, February 26, 2012

best ever, last minute - easy fruit cake recipe


For a no-fuss - last minute - moist fruit cake, guaranteed to become a favourite - here is the recipe...
You don't have to make it just at Christmas or Easter...

best ever last minute Fruit Cake


Ingredients:
1 kg mixed dried fruit. (If you like a darker looking cake, add prunes to the mix. Everytime we make this, the mixed dried fruit stays the same but we add other fruit to it as well: dried cranberries, crushed pineapple etc )
½ cup liquid. (Use sherry, rum or Earl Grey tea)
200g butter
2 cups flour
½ cup sugar
½ teaspoon baking soda
Pinch of salt
2 eggs
½ cup milk
¼ cup honey


Method:

Soak dried fruit in the liquid overnight


then...
Rub butter into flour in a large bowl
Add sugar, baking soda and salt then mix in the soaked dried fruit mix
In a separate bowl, mix eggs with milk and honey


Add to the fruit mixture and mix well with your hands


Put into a lined tin (23cm)
Bake at 160°C for 2½ hours

Enjoy, with or without icing

You know you're serving up something good when everyone who tastes it asks for the recipe
This one is a winner


easy fruit cake recipe

Monday, February 06, 2012

Apricot (fudge) Slice recipe with pictures


Apricot Slice


This no-bake Apricot Slice treat is a variation on a number of different recipes.
Basic Apricot Slice is great but you may as well indulge a sweet-tooth to the max if you're putting in some effort. 
That simply means adding white macadamia chocolate bits to the base and complimenting the whole thing with lemon and coconut icing.

For the base
250g butter
1 cup brown sugar
1 can condensed milk
2 cups dried apricots, chopped
2 packets plain (wine) biscuits, crushed
½ cup white chocolate, roughly chopped


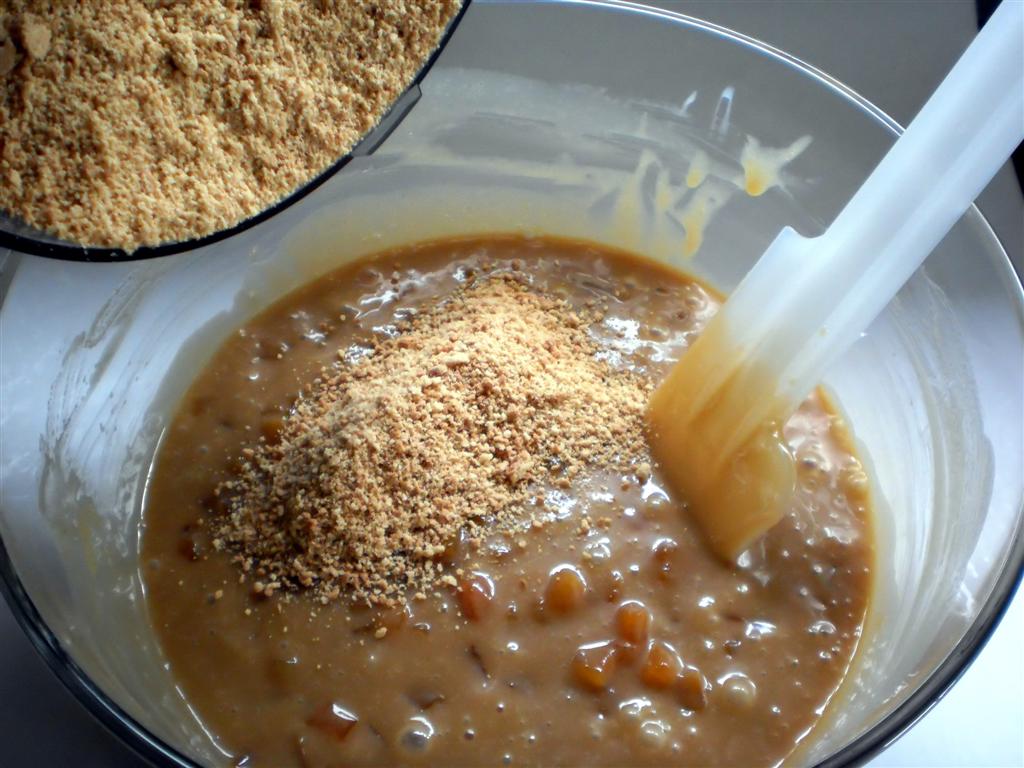
Melt butter, brown sugar and condensed milk. 


You can melt it in a microwave proof dish for 2 minutes, stir and microwave another minute, then another - and another...

or stir in a heavy based saucepan over a low heat until it's a fudgy-brown colour and everything is melted


Chop up dried apricots


view chopping as active relaxation instead of a chore


add chopped apricots to melted butter, sugar and condensed milk mix


then add the crushed wine (plain) biscuits


If you don't have white chocolate bits, feel free to leave this step out


Press the mix you have just made into a tin (20cm x 30cm) - lined with greaseproof paper

I omitted this step of the greaseproof paper and had a difficult time getting the slice out of the tin once it had set


For the topping
100g butter
1½ cups Icing Sugar (lemon flavoured)
1-2 Tablespoons hot water

¼ cup coconut
grated lemon zest (to your own preference - or leave out if you don't have lemons handy)

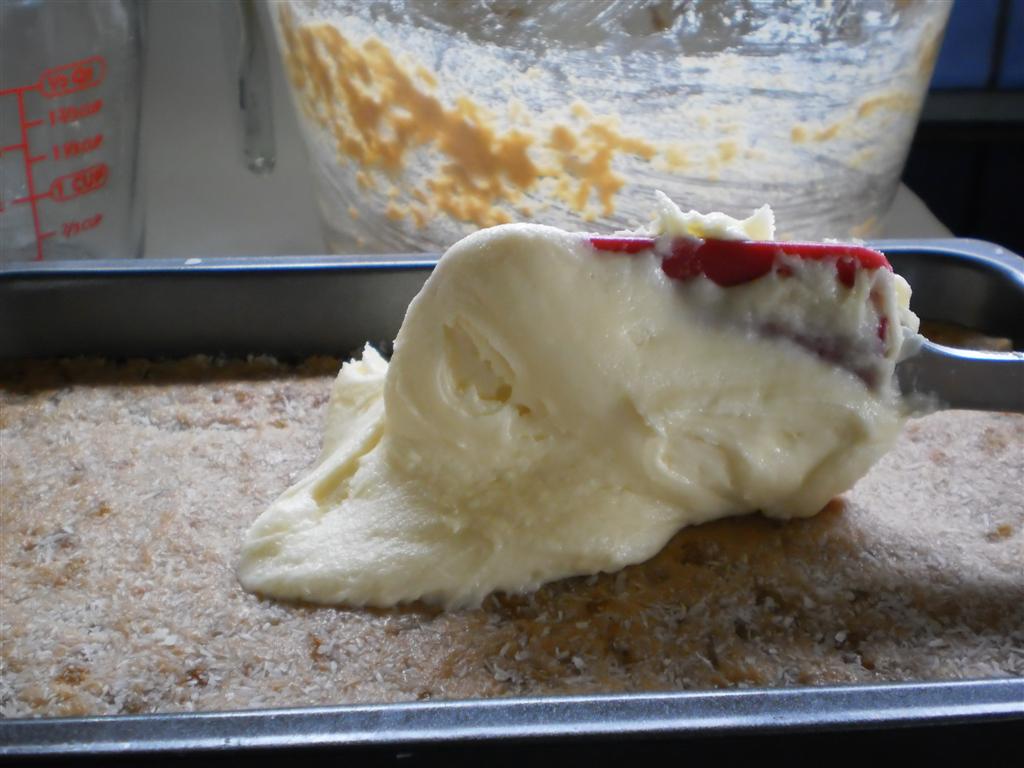
Beat butter until fluffy and pale


Add icing sugar and water until light and fluffy


Spread over the slice


Sprinkle with coconut and (optional) grated lemon zest


put it in the fridge for 2 hours to set


Then cut into squares or slice as is and enjoy with a good cup of tea

Apricot  Fudge  Slice


There you have it - Apricot Fudge Slice... enjoy


LinkWithin

Related Posts Plugin for WordPress, Blogger...